Kubernetes is a system for managing containerized applications in a clustered environment. It provides basic mechanisms for deployment, maintenance and scaling of applications on public, private or hybrid setups. It also comes with self-healing features where containers can be auto provisioned, restarted or even replicated.
![]()
Kubernetes is still at an early stage, please expect design and API changes over the coming year. In this blog post, we’ll show you how to install a Kubernetes cluster with three minions on CentOS 7, with an example on how to manage pods and services.
Kubernetes Components
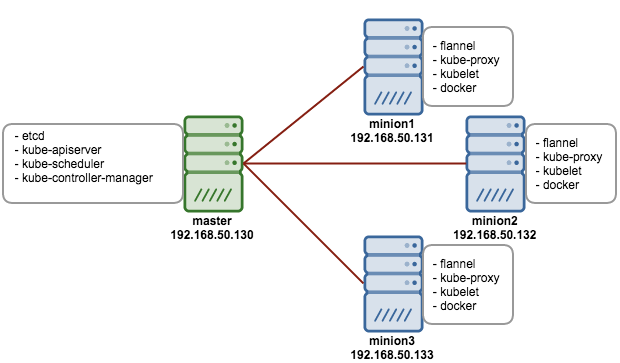
Kubernetes works in server-client setup, where it has a master providing centralized control for a number of minions. We will be deploying a Kubernetes master with three minions, as illustrated in the diagram further below.
Kubernetes has several components:
- etcd - A highly available key-value store for shared configuration and service discovery.
- flannel - An etcd backed network fabric for containers.
- kube-apiserver - Provides the API for Kubernetes orchestration.
- kube-controller-manager - Enforces Kubernetes services.
- kube-scheduler - Schedules containers on hosts.
- kubelet - Processes a container manifest so the containers are launched according to how they are described.
- kube-proxy - Provides network proxy services.
Deployment on CentOS 7
We will need 4 servers, running on CentOS 7.1 64 bit with minimal install. All components are available directly from the CentOS extras repository which is enabled by default. The following architecture diagram illustrates where the Kubernetes components should reside:
Prerequisites
1. Disable iptables on each node to avoid conflicts with Docker iptables rules:
$ systemctl stop firewalld
$ systemctl disable firewalld
2. Install NTP and make sure it is enabled and running:
$ yum -y install ntp
$ systemctl start ntpd
$ systemctl enable ntpd
Setting up the Kubernetes Master
The following steps should be performed on the master.
1. Install etcd and Kubernetes through yum:
$ yum -y install etcd kubernetes2. Configure etcd to listen to all IP addresses inside /etc/etcd/etcd.conf. Ensure the following lines are uncommented, and assign the following values:
ETCD_NAME=default
ETCD_DATA_DIR="/var/lib/etcd/default.etcd"
ETCD_LISTEN_CLIENT_URLS="http://0.0.0.0:4001"
3. Configure Kubernetes API server inside /etc/kubernetes/apiserver. Ensure the following lines are uncommented, and assign the following values:
KUBE_API_ADDRESS="--address=0.0.0.0"
KUBE_API_PORT="--port=8080"
KUBELET_PORT="--kubelet_port=10250"
KUBE_ETCD_SERVERS="--etcd_servers=http://127.0.0.1:4001"
KUBE_SERVICE_ADDRESSES="--portal_net=10.254.0.0/16"
KUBE_ADMISSION_CONTROL="--admission_control=NamespaceAutoProvision,LimitRanger,ResourceQuota"
KUBE_API_ARGS=""
4. Configure the Kubernetes controller manager inside /etc/kubernetes/controller-manager. Define the minion machines’ IP addresses:
KUBELET_ADDRESSES="--machines=192.168.50.131,192.168.50.132,192.168.50.133"5. Define flannel network configuration in etcd. This configuration will be pulled by flannel service on minions:
$ etcdctl mk /coreos.com/network/config '{"Network":"172.17.0.0/16"}'6. Start and enable etcd, kube-apiserver, kube-controller-manager and kube-scheduler:
$ for SERVICES in etcd kube-apiserver kube-controller-manager kube-scheduler; do
    systemctl restart $SERVICES
    systemctl enable $SERVICES
    systemctl status $SERVICES
done
7. At this point, we should notice that all Minions’ statuses are still unknown because we haven’t started any of them yet:
$ kubectl get minions
NAME             LABELS        STATUS
192.168.50.131   Schedulable   <none>    Unknown
192.168.50.132   Schedulable   <none>    Unknown
192.168.50.133   Schedulable   <none>    Unknown
Setting up Kubernetes Minions
The following steps should be performed on minion1, minion2 and minion3 unless specified otherwise.
1. Install flannel and Kubernetes using yum:
$ yum -y install flannel kubernetes2. Configure etcd server for flannel service. Update the following line inside /etc/sysconfig/flanneld to connect to the respective master:
FLANNEL_ETCD="http://192.168.50.130:4001"3. Configure Kubernetes default config at /etc/kubernetes/config, ensure you update the KUBE_MASTER value to connect to the Kubernetes master API server:
KUBE_MASTER="--master=http://192.168.50.130:8080"4. Configure kubelet service inside /etc/kubernetes/kubelet as below:
minion1:
KUBELET_ADDRESS="--address=0.0.0.0"
KUBELET_PORT="--port=10250"
# change the hostname to this host’s IP address
KUBELET_HOSTNAME="--hostname_override=192.168.50.131"
KUBELET_API_SERVER="--api_servers=http://192.168.50.130:8080"
KUBELET_ARGS=""minion2:
KUBELET_ADDRESS="--address=0.0.0.0"
KUBELET_PORT="--port=10250"
# change the hostname to this host’s IP address
KUBELET_HOSTNAME="--hostname_override=192.168.50.132"
KUBELET_API_SERVER="--api_servers=http://192.168.50.130:8080"
KUBELET_ARGS=""minion3:
KUBELET_ADDRESS="--address=0.0.0.0"
KUBELET_PORT="--port=10250"
# change the hostname to this host’s IP address
KUBELET_HOSTNAME="--hostname_override=192.168.50.133"
KUBELET_API_SERVER="--api_servers=http://192.168.50.130:8080"
KUBELET_ARGS=""
5. Start and enable kube-proxy, kubelet, docker and flanneld services:
$ for SERVICES in kube-proxy kubelet docker flanneld; do
    systemctl restart $SERVICES
    systemctl enable $SERVICES
    systemctl status $SERVICES
done
6. On each minion, you should notice that you will have two new interfaces added, docker0 and flannel0. You should get different range of IP addresses on flannel0 interface on each minion, similar to below:
minion1:
$ ip a | grep flannel | grep inet
inet 172.17.45.0/16 scope global flannel0minion2:
$ ip a | grep flannel | grep inet
inet 172.17.38.0/16 scope global flannel0minion3:
$ ip a | grep flannel | grep inet
inet 172.17.93.0/16 scope global flannel0
6. Now login to Kubernetes master node and verify the minions’ status:
$ kubectl get minions
NAME             LABELS        STATUS
192.168.50.131   Schedulable   <none>    Ready
192.168.50.132   Schedulable   <none>    Ready
192.168.50.133   Schedulable   <none>    Ready
You are now set. The Kubernetes cluster is now configured and running. We can start to play around with pods.
Creating Pods (Containers)
To create a pod, we need to define a yaml file in the Kubernetes master, and use the kubectl command to create it based on the definition. Create a mysql.yaml file:
$ mkdir pods
$ cd pods
$ vim mysql.yaml
And add the following lines:
apiVersion: v1beta3
kind: Pod
metadata:
  name: mysql
  labels:
    name: mysql
spec:
  containers:
    - resources:
        limits :
          cpu: 1
      image: mysql
      name: mysql
      env:
        - name: MYSQL_ROOT_PASSWORD
          # change this
          value: yourpassword
      ports:
        - containerPort: 3306
          name: mysql
Create the pod:
$ kubectl create -f mysql.yamlIt may take a short period before the new pod reaches the Running state. Verify the pod is created and running:
$ kubectl get pods
POD       IP            CONTAINER(S)   IMAGE(S)   HOST                            LABELS       STATUS    CREATED
mysql     172.17.38.2   mysql          mysql      192.168.50.132/192.168.50.132   name=mysql   Running   3 hours
So, Kubernetes just created a Docker container on 192.168.50.132. We now need to create a Service that lets other pods access the mysql database on a known port and host.
Creating Service
At this point, we have a MySQL pod inside 192.168.50.132. Define a mysql-service.yaml as below:
apiVersion: v1beta3
kind: Service
metadata:
  labels:
    name: mysql
  name: mysql
spec:
  publicIPs:
    - 192.168.50.132
  ports:
    # the port that this service should serve on
    - port: 3306
  # label keys and values that must match in order to receive traffic for this service
  selector:
    name: mysql
Start the service:
$ kubectl create -f mysql-service.yamlYou should get a 10.254.x.x IP range assigned to the mysql service. This is the Kubernetes internal IP address defined in /etc/kubernetes/apiserver. This IP is not routable outside, so we defined the public IP instead (the interface that connected to external network for that minion):
$ kubectl get services
NAME            LABELS                                    SELECTOR     IP               PORT(S)
kubernetes      component=apiserver,provider=kubernetes   <none>       10.254.0.2       443/TCP
kubernetes-ro   component=apiserver,provider=kubernetes   <none>       10.254.0.1       80/TCP
mysql           name=mysql                                name=mysql   10.254.13.156    3306/TCP
                                                                       192.168.50.132
Let’s connect to our database server from outside (we used MariaDB client on CentOS 7):
$ mysql -uroot -p -h192.168.50.132
Welcome to the MariaDB monitor.  Commands end with ; or \g.
Your MySQL connection id is 4
Server version: 5.6.24 MySQL Community Server (GPL)

Copyright (c) 2000, 2014, Oracle, MariaDB Corporation Ab and others.

Type 'help;' or '\h' for help. Type '\c' to clear the current input statement.

MySQL [(none)]> show variables like '%version%';
+-------------------------+------------------------------+
| Variable_name           | Value                        |
+-------------------------+------------------------------+
| innodb_version          | 5.6.24                       |
| protocol_version        | 10                           |
| slave_type_conversions  |                              |
| version                 | 5.6.24                       |
| version_comment         | MySQL Community Server (GPL) |
| version_compile_machine | x86_64                       |
| version_compile_os      | Linux                        |
+-------------------------+------------------------------+
7 rows in set (0.01 sec)
That’s it! You should now be able to connect to the MySQL container that resides on minion2.
Check out the Kubernetes guestbook example on how to build a simple, multi-tier web application with Redis in master-slave setup. In a follow-up blog post, we are going to play around with Galera cluster containers on Kubernetes. Stay tuned!
References
- Creating a Kubernetes Cluster to Run Docker Formatted Container Images - https://access.redhat.com/articles/1353773
- Kubernetes Github - https://github.com/googlecloudplatform/kubernetes
- Persistent Installation of MySQL and WordPress on Kubernetes - https://github.com/GoogleCloudPlatform/kubernetes/tree/master/examples/mysql-wordpress-pd