1. What is AWS / the Cloud?
Amazon Web Services is an Infrastructure as a Service platform, comprising a large number of independent and semi-independent services. The purpose of Infrastructure as a Service platforms is to offer, on a commodity basis, services that previously required the purchase of capital-intensive infrastructure components such as high-end servers, network routers and switches, and for larger enterprises, even their own datacenters.
1.1. Objectives of this white paper
The purpose of this white paper is to provide a step by step guide to building a deployment environment for your databases on AWS, to detail the configuration of such an environment, and to instruct on important performance considerations.
2. Why the Cloud?
2.1. Pros
2.1.1. Rapid Deployment/Scalability
Cloud resources, such as virtual machines, containers, serverless compute resources and databases, among others, are available at the click of a button. A full solution can be spun up in a fraction of the time in which it can be deployed on one’s own hardware. With the use of auto-scaling technology, new resources can automatically be provisioned depending on such metrics as current or expected traffic load on the existing infrastructure, or when an existing resource fails.
2.1.2. Offsite backup “included”
Massive-scale object stores such as AWS S3 (Simple Storage Service) provide effectively infinite storage capacity for your data, including backups. With advanced S3 functionality such as “lifecycle management”, data can be archived for lower cost long-term storage, and can be expired after a user-defined length of time, to automatically manage your use of the service and associated costs.
2.1.3. Low-friction DR capability
With AWS’ automation and templating tools, a disaster recovery environment suitable for the full or partial recovery of your company resources can be defined in code, ready for when it is needed, and launched with as much or as little customisation as required for your specific scenario.
2.2. Cons
2.2.1. Security
AWS offers a flexible approach to security, and a variety of methods of securing your data from unauthorised access. Some of these, such as EC2 security groups, provide a simple approach where specific IP addresses and ranges are explicitly allowed and all else is by default rejected, while EC2 instances in the same security group can communicate without security restriction. Others, like S3, take a more complex approach, relying on AWS credential sets, Access Control Lists, and JSON-based policy documents. These disparate methods in the same environment can result in improper security management.
2.2.2. Third Party control of data
One of the primary concerns with Infrastructure as a Service is the necessity of storing your data on third party servers, to which you have no physical access. This necessitates trusting a third party with your data. Mitigating this, Amazon supports encryption at rest for data on many of its services, limiting customers exposure in the event of unauthorised internal or external access.
2.2.3. High cost/Limitations of available HA solutions
While High Availability is built into services such as DynamoDB and S3, and is largely transparent within a single geographical region, your data stored in EC2 and similar services is not automatically redundant. It is up to you to design appropriate levels of redundancy into your solutions. While AWS provides the resources to enable you to do this, additional costs will be incurred. It is therefore beneficial to evaluate your data prior to deployment, to ascertain whether High Availability or Redundancy are required, or indeed if archival storage will suffice.
3. Deploying on AWS
As a commodity cloud IaaS platform, AWS is very diverse and caters for a wide variety of use cases. Cost and complexity can be increased or decreased according to user requirements, but certain rules should be observed for all production deployments:
- Design for failure: Unlike traditional datacentre-based solutions, commodity cloud environments rely heavily on this principle. No service or solution should be dependent upon a single node, as nodes are virtual resources and are replaced rather than repaired in case of failure, and all data should be stored in more than one location. In AWS, it is advisable to store data backups in more than one geographical region for full redundancy. AWS S3 and Glacier provide effectively unlimited storage and archival storage respectively, including the functionality to replicate data to more than one geographic region.
- Security: It is a common misconception that data in the cloud is automatically secure, that the cloud itself is inherently secure. IaaS environments such as AWS provide the functionality needed to implement a very high level of security for your data, but the level of security depends largely on your architecture, and on a correct understanding and appropriate configuration of the provided security tools and features. AWS Identity and Access Management (IAM) provides the ability to silo users and permissions, to enhance security. AWS also provides a wealth of other security options integrated into the various products, which can be configured to enhance your security.
- Pricing: Unlike in traditional datacentre architectures, there are no expensive capital acquisitions, no physical space considerations. An increase in compute, memory, storage or bandwidth can be achieved relatively easily in AWS as needed. The result is the ability to build out a system conservatively, rather than over-provisioning for “future-proofing”, which is unnecessarily expensive. Consider relatively conservative resource usage from the outset, and you can scale out and up as your use requires.
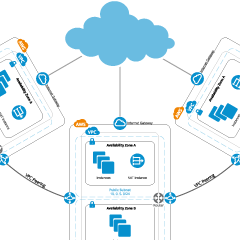
4. Deployment Architecture
This will comprise a dual availability zone deployment using AWS VPC (Virtual Private Cloud) for redundancy and a secure environment. The VPC environment will contain two private subnets, and you will create a node in each zone to host your database servers. This will provide redundant database server hosts in the same region, with low-latency communication between them. Additionally, you will create a second VPC in a different region to securely host another subnet, and another database server, providing geographical redundancy, but at the cost of higher expense and higher latency.
4.1. Deployment Prerequisites
4.1.1. Command Line Tools
ou will deploy this environment using the AWS Command Line tools. This is a suite of tools written in the Python programming language, and should be installed before you commence. Instructions are available directly from Amazon here.
4.1.2. IAM (Identity and Access Management) User
In a production environment, we strongly suggest the use of an IAM user. This is a user account subordinate to your AWS “root” login credentials, the permissions of which can be restricted to required tasks. You will use an IAM user account with administrator privileges for the purposes of this whitepaper. With the AWS Command Line tools installed and configured, execute the following commands to create the user:
| Action | Command |
|---|---|
| Create user “whitepaper” | aws iam create-user \ --path "/" \ --user-name "whitepaper" |
| Grant admin permissions to user “whitepaper” | aws iam put-user-policy \ --user-name "whitepaper" \ --policy-name "AllAccessPolicy" \ --policy-document "{\"Statement\":[{\"Effect\":\"Allow\",\"Action\":\"*\",\"Resource\":\"*\"}]}" |
| Generate Access Keys for user “whitepaper”. Save these credentials, and on completion of IAM user configuration reconfigure your Command Line tools to use these instead. | aws iam create-access-key \ --user-name "whitepaper" |
| Allow AWS Console login at https://your_account_id.signin.aws.amazon.com/console/ | aws iam create-login-profile \ --user-name "whitepaper" \ --password "yourPassword" |
4.1.3. Re-configure your AWS Command Line tools credentials
Log out and reconfigure your AWS Command Line tools to use your new credentials before proceeding. While this is not strictly necessary, it is advisable to use good security practices at all times.
4.2. Create your initial VPC
First you create the VPC itself, a virtual construct identified by a label in the form of vpc-1a2b3c4d. Creation of sub-components, such as subnets, requires the VPC ID.
user@host:~$ aws ec2 create-vpc --cidr-block 10.0.0.0/16
{
    "Vpc": {
        "VpcId": "vpc-d4c3b2a1",
        ...
        "CidrBlock": "10.0.0.0/16",
        "IsDefault": false
    }
}
The CidrBlock specified is the IP address range inside which your VPC subnets and hosts will be created. The IsDefault parameter defines whether the VPC was manually created or is a default VPC, a VPC configured automatically via AWS. As modifying the default VPC can have consequences for existing EC2 resources, you have created a new one in which to deploy your resources. To view your new VPC, you can run the describe-vpcs command, specifying the VPC ID returned by the create-vpc command.
user@host:~$ aws ec2 describe-vpcs --vpc-idvpc-d4c3b2a14.3. Create Subnets
Subnets, when created in VPC, will by default choose an availability zone randomly. A specific availability zone can be specified with the --availability-zone parameter. As you can see below, the subnet was automatically created in eu-central-1c.
user@host:~$ aws ec2 create-subnet --vpc-idvpc-d4c3b2a1 --cidr-block 10.0.1.0/24
{
    "Subnet": {
        "AvailabilityZone": "eu-central-1c",
        "AvailableIpAddressCount": 251,
        "DefaultForAz": false,
        "Ipv6CidrBlockAssociationSet": [],
        "VpcId": "vpc-d4c3b2a1",
        "State": "pending",
        "MapPublicIpOnLaunch": false,
        "SubnetId": "subnet-8e917ac3",
        "CidrBlock": "10.0.1.0/24",
        "AssignIpv6AddressOnCreation": false
    }
}
Next, you create a subnet in a different availability zone, in this case eu-central-1b, for redundancy.
user@host:~$ aws ec2 create-subnet --vpc-idvpc-d4c3b2a1 --cidr-block 10.0.5.0/24--availability-zone eu-central-1b
{
    "Subnet": {
        "AvailabilityZone": "eu-central-1b",
        "AvailableIpAddressCount": 251,
        "DefaultForAz": false,
        "Ipv6CidrBlockAssociationSet": [],
        "VpcId": "vpc-d4c3b2a1",
        "State": "pending",
        "MapPublicIpOnLaunch": false,
        "SubnetId": "subnet-541a302e",
        "CidrBlock": "10.0.5.0/24",
        "AssignIpv6AddressOnCreation": false
    }
}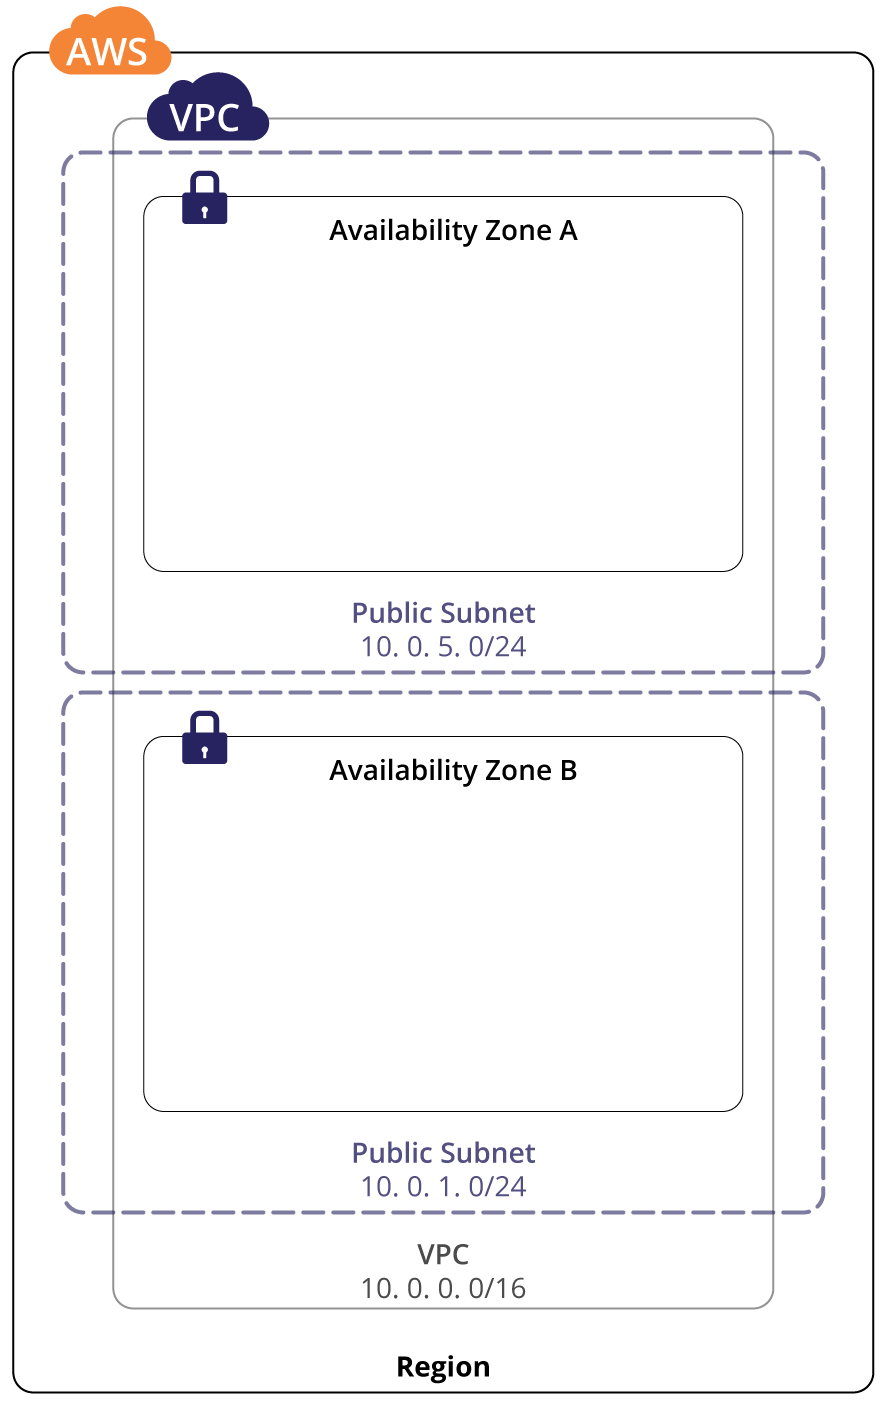
4.4. Internet Access
In case access to a node from the Internet is required, as in the case of a webserver, the concept of a public subnet exists. A public subnet is created from an existing private subnet by virtue of adding an Internet Gateway to your VPC, and adding it to the route table in the form of a rule directing traffic to wildcard route 0.0.0.0/0 to the Internet Gateway, identified in the form igw-d2b1c3a4.
In this case, for the purposes of security, it is recommended that the public subnet be used only to host instances that must be accessed from the Internet. Database hosts within the private subnet(s) will be able to communicate with each other, and the web server/proxy server in the public subnet will be able to communicate with them.
To create an Internet Gateway, you execute the following command, and note the InternetGatewayId value in the output:
user@host:~$ aws ec2 create-internet-gateway
{
    "InternetGateway": {
        "Tags": [],
        "Attachments": [],
        "InternetGatewayId": "igw-012dca3b"
    }
}
Now that you have your Internet Gateway, you must attach it to your VPC, as follows (no output is expected):
user@host:~$ aws ec2 attach-internet-gateway --vpc-idvpc-d4c3b2a1 --internet-gateway-idigw-012dca3b4.5. Route table
To route network traffic, a route table is required, as noted above. The route table, as its name implies, contains network routing information between your subnets and other components of your infrastructure, such as the Internet Gateway, and the Customer Gateway which we will deal with later.
To create the initial custom route table, you use the following command:
user@host:~$ aws ec2 create-route-table --vpc-idvpc-d4c3b2a1
{
    "RouteTable": {
        "Associations": [],
        "RouteTableId": "rtb-98fe76dc",
        "VpcId": "vpc-d4c3b2a1",
        "PropagatingVgws": [],
        "Tags": [],
        "Routes": [
            {
                "GatewayId": "local",
                "DestinationCidrBlock": "10.0.0.0/16",
                "State": "active",
                "Origin": "CreateRouteTable"
            }
        ]
    }
}
Note the RouteTableId as you will use it to add the Internet Gateway route to your new route table. The create-route command shown here should return true, if successful.
user@host:~$ aws ec2 create-route --route-table-idrtb-98fe76dc --destination-cidr-block 0.0.0.0/0--gateway-idigw-012dca3b
{
    "Return": true
}
To verify that your route has been added to the route table, you can run describe-route-tables as follows:
user@host:~$ aws ec2 describe-route-tables --route-table-idrtb-98fe76dc
{
    "RouteTables": [
        {
            "Associations": [],
            "RouteTableId": "rtb-98fe76dc",
            "VpcId": "vpc-d4c3b2a1",
            "PropagatingVgws": [],
            "Tags": [],
            "Routes": [
                {
                    "GatewayId": "local",
                    "DestinationCidrBlock": "10.0.0.0/16",
                    "State": "active",
                    "Origin": "CreateRouteTable"
                },
                {
                    "GatewayId": "igw-012dca3b",
                    "DestinationCidrBlock": "0.0.0.0/0",
                    "State": "active",
                    "Origin": "CreateRoute"
                }
            ]
        }
    ]
}
Finally, to associate the route table with the appropriate subnet, you’ll call associate-route-table:
user@host:~$ aws ec2 associate-route-table  --subnet-idsubnet-541a302e --route-table-idrtb-6912fa02
{
    "AssociationId": "rtbassoc-dea5e9b5"
}
As shown in Figure 2, above, you have built out a complete VPC network at this point. Before you approach launching your hosts and configuring the various resources needed to support them, let’s recap what has been done so far.
- Using the create-vpc command, you first created your new Virtual Private Cloud, and associated the IPv4 address range 10.0.0.0/16 with it. This is an isolated network, that cannot communicate with the outside world.
- Next, you created two individual subnets, with the create-subnet command, within the 10.0.0.0/16 range in your VPC, 10.0.1.0/24 and 10.0.5.0/24. Note here that AWS reserves certain IP addresses in your VPC subnet. These are the IP addresses ending in .0, .1, .2, .3, .255. The first and last of these are the network address and broadcast address respectively, and as expected. The other 3 IP addresses are reserved for AWS functionality as follows:
- 10.0.x.1: Subnet gateway IP address
- 10.0.x.2: AWS DNS Server. Allows for name resolution through the gateway
- 10.0.x.3: Subnet DHCP Services
- To facilitate access from the Internet, you added an Internet Gateway with create-internet-gateway and attached it to a subnet with attach-internet-gateway. You will be able to attach publicly routable IP addresses – or in AWS terms Elastic IP Addresses – to hosts in this subnet to make them accessible on the Internet. You can run services such as web servers in this subnet. Note that any host without an Elastic IP Address in this subnet is still unable to be accessed directly via the Internet and security remains intact.
- To complete your Internet configuration, you added a route table, using create-route-table and using create-route you added a route to the 0.0.0.0/0 wildcard network address via the Internet Gateway. This means that all traffic destined for external addresses will be routed via the Internet Gateway.
4.6. VPC Gateway
The VPC Gateway is an IPsec-secured gateway into your VPC. It exists to facilitate VPN connections from your remote location to the VPC. It works in conjunction with another component, the Customer Gateway, which is the virtual device your VPN router connects to. To configure a VPC Gateway, you will use the create-vpn-gateway command. Note that the type specified, ipsec.1, is currently the only available option.
user@host:~$ aws ec2 create-vpn-gateway --typeipsec.1
{
    "VpnGateway": {
        "State": "available",
        "Type": "ipsec.1",
        "VpnGatewayId": "vgw-9a4cacf3",
        "VpcAttachments": []
    }
}
Now that you have a VPC Gateway, it should be attached to the VPC itself. This is achieved by means of the attach-vpn-gateway command.
user@host:~$ aws ec2 attach-vpn-gateway --vpc-idvpc-d4c3b2a1 --vpn-gateway-idvgw-9a4cacf3
{
    "VpcAttachement": {
        "State": "attaching",
        "VpcId": "vpc-d4c3b2a1"
    }
}
To connect your router to the VPC, you will need a Customer Gateway, which you set up with the create-customer-gateway-command. The public IP address specified in the command should be the IP address of the Northbound interface of your VPN router, and the BGP-ASN should be the BGP Autonomous Systems Number of your internet segment, if applicable. When configuring dual redundant connections to your VPC, BGP provides superior link failure detection. If you do not have a BGP ASN, you can use 65534.
user@host:~$ aws ec2 create-customer-gateway --typeipsec.1 --public-ip 1.1.1.1 --bgp-asn 65534
{
    "CustomerGateway": {
        "CustomerGatewayId": "cgw-0e11f167",
        "IpAddress": “1.1.1.1”,
        "State": "available",
        "Type": "ipsec.1",
        "BgpAsn": "65534"
    }
}
You cannot create more than one customer gateway with the same VPN type, IP address, and BGP ASN parameter values. If you run an identical request more than one time, the first request creates the customer gateway, and subsequent requests return information about the existing customer gateway. The subsequent requests do not create new customer gateways.
Finally, to configure your device, you should refer to the AWS Network Administrator Guide for detailed information, and a list of officially supported devices.
4.7. Host Dependencies
Now that you have configured your network, it is time to add hosts. You will first create host dependencies, such as the Key Pair required for ssh login to the hosts, and the Security Group that provides basic firewall functionality for your hosts. You will also create a NAT Instance, a device which allows your hosts to communicate outbound with Internet hosts, to facilitate such functionality as operating system updates.
First, let’s create the Key Pair. As you can see, the output of this command is redirected to a file, YourKey.pem. This file is your ssh key. You should ensure you keep a backup of this key, as without it you will be unable to log in to your hosts. Note also that ssh will not allow you to use a key that has open permissions. Linux/UNIX permission mode 400 is recommended.
user@host:~$ aws ec2 create-key-pair --key-name YourKey --query 'KeyMaterial'--output text > YourKey.pem
user@host:~$ chmod400 YourKey.pem
AWS facilitates the creation of up to 5,000 Key Pairs per region, but it is important to note that only the Key Pair with which an AWS instance is launched can be used to log in directly to that instance.
Now you need your Security Group. The Security Group controls access to your host or hosts, and in VPC can also be used to block outgoing traffic. Make sure to note your security group GroupId for the next stage.
user@host:~$ aws ec2 create-security-group --group-name SSHAccess --description "SSH Access"--vpc-idvpc-d4c3b2a1
{
    "GroupId": "sg-29362c42"
}
Now that you have created a security group, you’re going to add a rule to it. This rule allows unfettered ssh access by means of the wildcard network IP address 0.0.0.0/0. In practice however, you should use a more restrictive range or specific IP address, to limit access to your hosts’ ssh port.
user@host:~$ aws ec2 authorize-security-group-ingress --group-idsg-29362c42 --protocol tcp --port 22 --cidr 0.0.0.0/0You are almost ready to launch your instances, but before you can proceed to this step, you will need to choose an AMI, or Amazon Machine Image, which is the operating system image that you wish to launch. AWS provide instructions for finding a suitable AMI here. Note that AMIs are specific to the region in which they are provided. For the purposes of this exercise, we will use a community-provided CentOS Linux 7 AMI in the EU-CENTRAL-1 region: ami-fa2df395
You will also need to decide on the type of AWS Instance that you wish to launch. The instance type dictates the number of CPU cores, the amount of RAM memory, its network performance, and availability of ephemeral storage, a data store included with some instance types. The ephemeral data storage, while benefiting from performance improvement due to direct attachment to the instance, unlike the persistent network-attached EBS (Elastic Block Storage), disappears when an instance is shutdown, and the data is irretrievable. For use cases that need high performance disk and that can survive data loss on shutdown, ephemeral is very useful.
AWS instance types can be reviewed here. You should spend some time reviewing this document, as it explains in detail the storage options available. Pay particular attention to Provisioned IOPS EBS storage, persistent network-attached storage with prescribed fixed performance characteristics. It is a good idea to test your environment with different levels of disk performance, as higher performance will also result in increased costs.
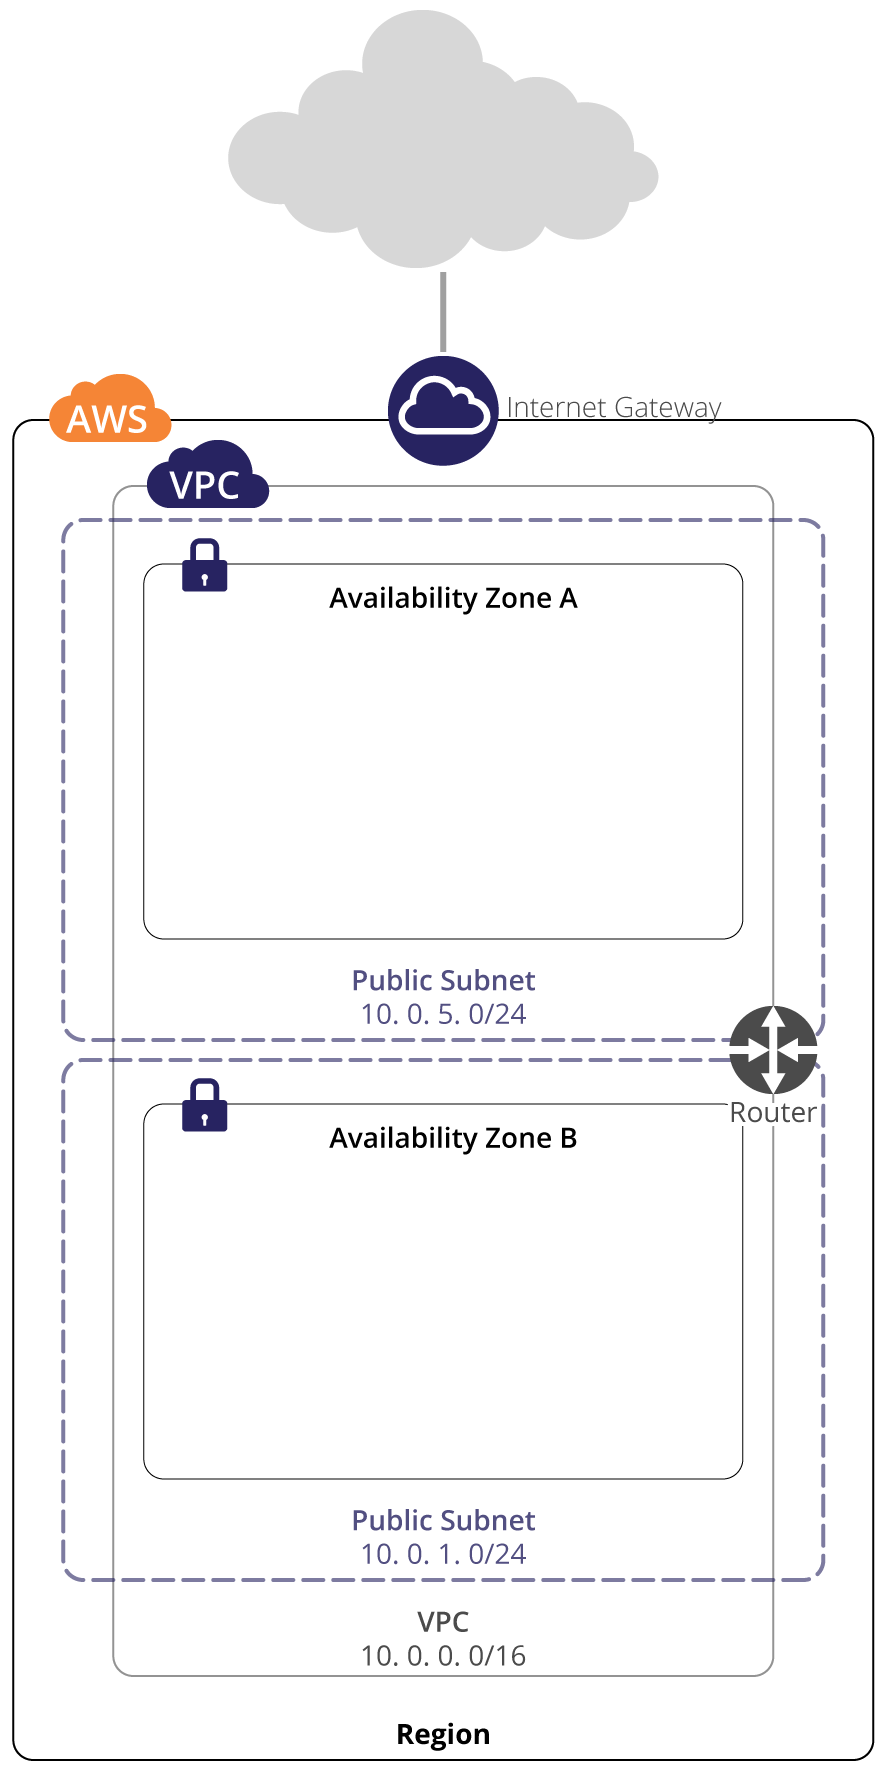
4.8. Launching Hosts
To launch our host, we use the run-instances command. The command launches the instance and returns a JSON document with a full description of the instance. From this output, note the InstanceId. This is the unique reference that you will use to query the instance and address it via the API or the AWS Command Line tools.
user@host:~$ aws ec2 run-instances --image-idami-fa2df395 --count 1 --instance-typet2.micro --key-name MyKeyPair --security-group-ids sg-29362c42 --subnet-idsubnet-541a302eUsing the InstanceId we can query the instance and confirm that it is in state “Running”. Once the instance is running, we can connect to it via ssh. Note that it may take some time to reach the running state, as resources are provisioned.
user@host:~$ aws ec2 describe-instances --instance-idi-0146854b7443af453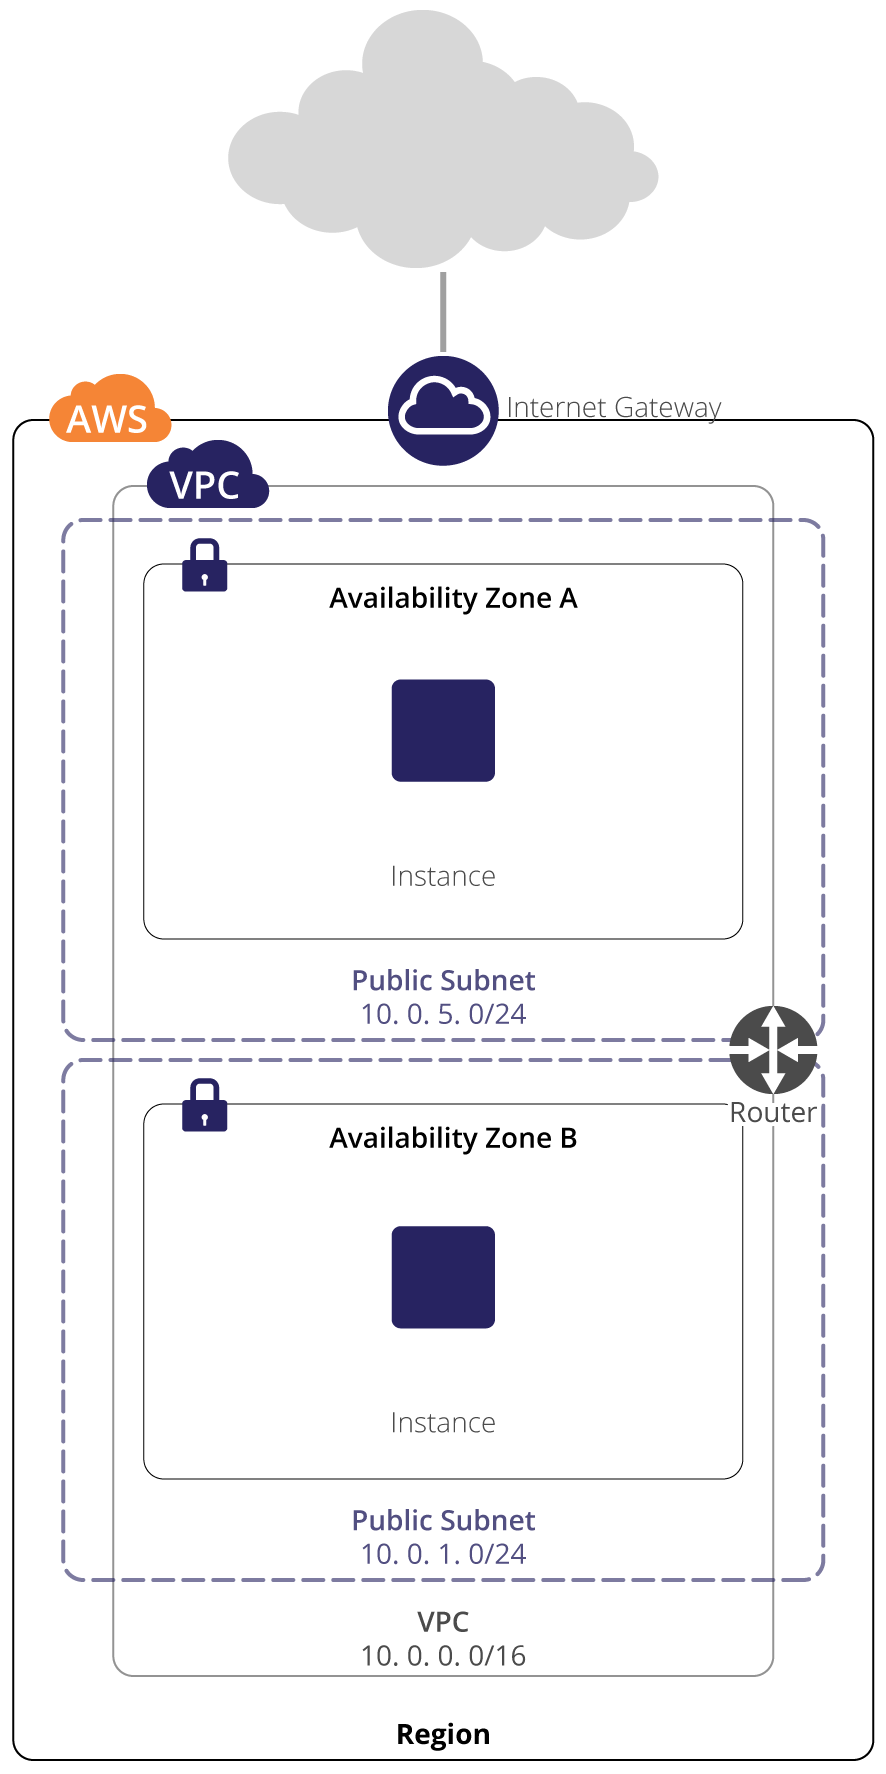
4.9. NAT Instances
A NAT Instance in your subnet allows your instance to communicate with external services, without exposing the host itself to the Internet, similar to your computers at home, which in general use your cable or DSL modem as a NAT device to access the Internet, but are not themselves directly exposed to it.
In AWS you must create a NAT Instance in each subnet in which you wish to give Internet access to hosts. To create a NAT Instance you will use the same process of launching an instance as previously, with a new security group, specific to the NAT Instance. You will also need to use an Amazon AMI configured for use as a NAT Instance. The following command will list appropriate AMIs.
user@host:~$ aws ec2 describe-images --filter Name="owner-alias",Values="amazon"--filter Name="name",Values="amzn-ami-vpc-nat*"To create the security group, you will use the same process previously documented, and associate with the appropriate subnet. The security group should be configured with the following rules:
| Inbound | |||
|---|---|---|---|
| Source | Protocol | Port Range | Note |
| Private Subnet Network Address e.g. 10.0.1.0/24 | TCP | 80 | Allow inbound HTTP traffic from servers in the private subnet |
| Private Subnet Network Address e.g. 10.0.1.0/24 | TCP | 443 | Allow inbound HTTPS traffic from servers in the private subnet |
| Public IP address range of your remote network. | TCP | 22 | Allow inbound SSH access to the NAT instance from your remote network (over the Internet gateway) |
| Outbound | |||
| Destination | Protocol | Port Range | Note |
| 0.0.0.0/0 | TCP | 80 | Allow outbound HTTP access to the Internet |
| 0.0.0.0/0 | TCP | 443 | Allow outbound HTTP access to the Internet |
Note that in terms of security, hosts launched within a single security group have, by default, unfettered communication with each other, with no need for additional security rules, other than for external access.
AWS also offers a fully redundant NAT Gateway option, a more complex premium option, on which you can find details here. The NAT Gateway can facilitate high volumes of traffic, with bursts of up to 10Gbps.
4.10. Geographical Redundancy
You now have an ostensibly complete VPC deployment, complete with EC2 host. The instructions provided can be used to deploy additional hosts as needed. For geographical redundancy, but with the previously noted increase in latency and AWS bandwidth charges that this will incur, you can use the previous process to create a second VPC in a second region. Due to AWS’ VPC Peering functionality, it is possible to connect your VPCs securely and protect traffic between the two VPCs.
To peer your VPCs, use the create-vpc-peering-connection command with your two VPC IDs:
user@host:~$ aws ec2 create-vpc-peering-connection --vpc-id<VPC ID> --peer-vpc-id<2nd VPC ID>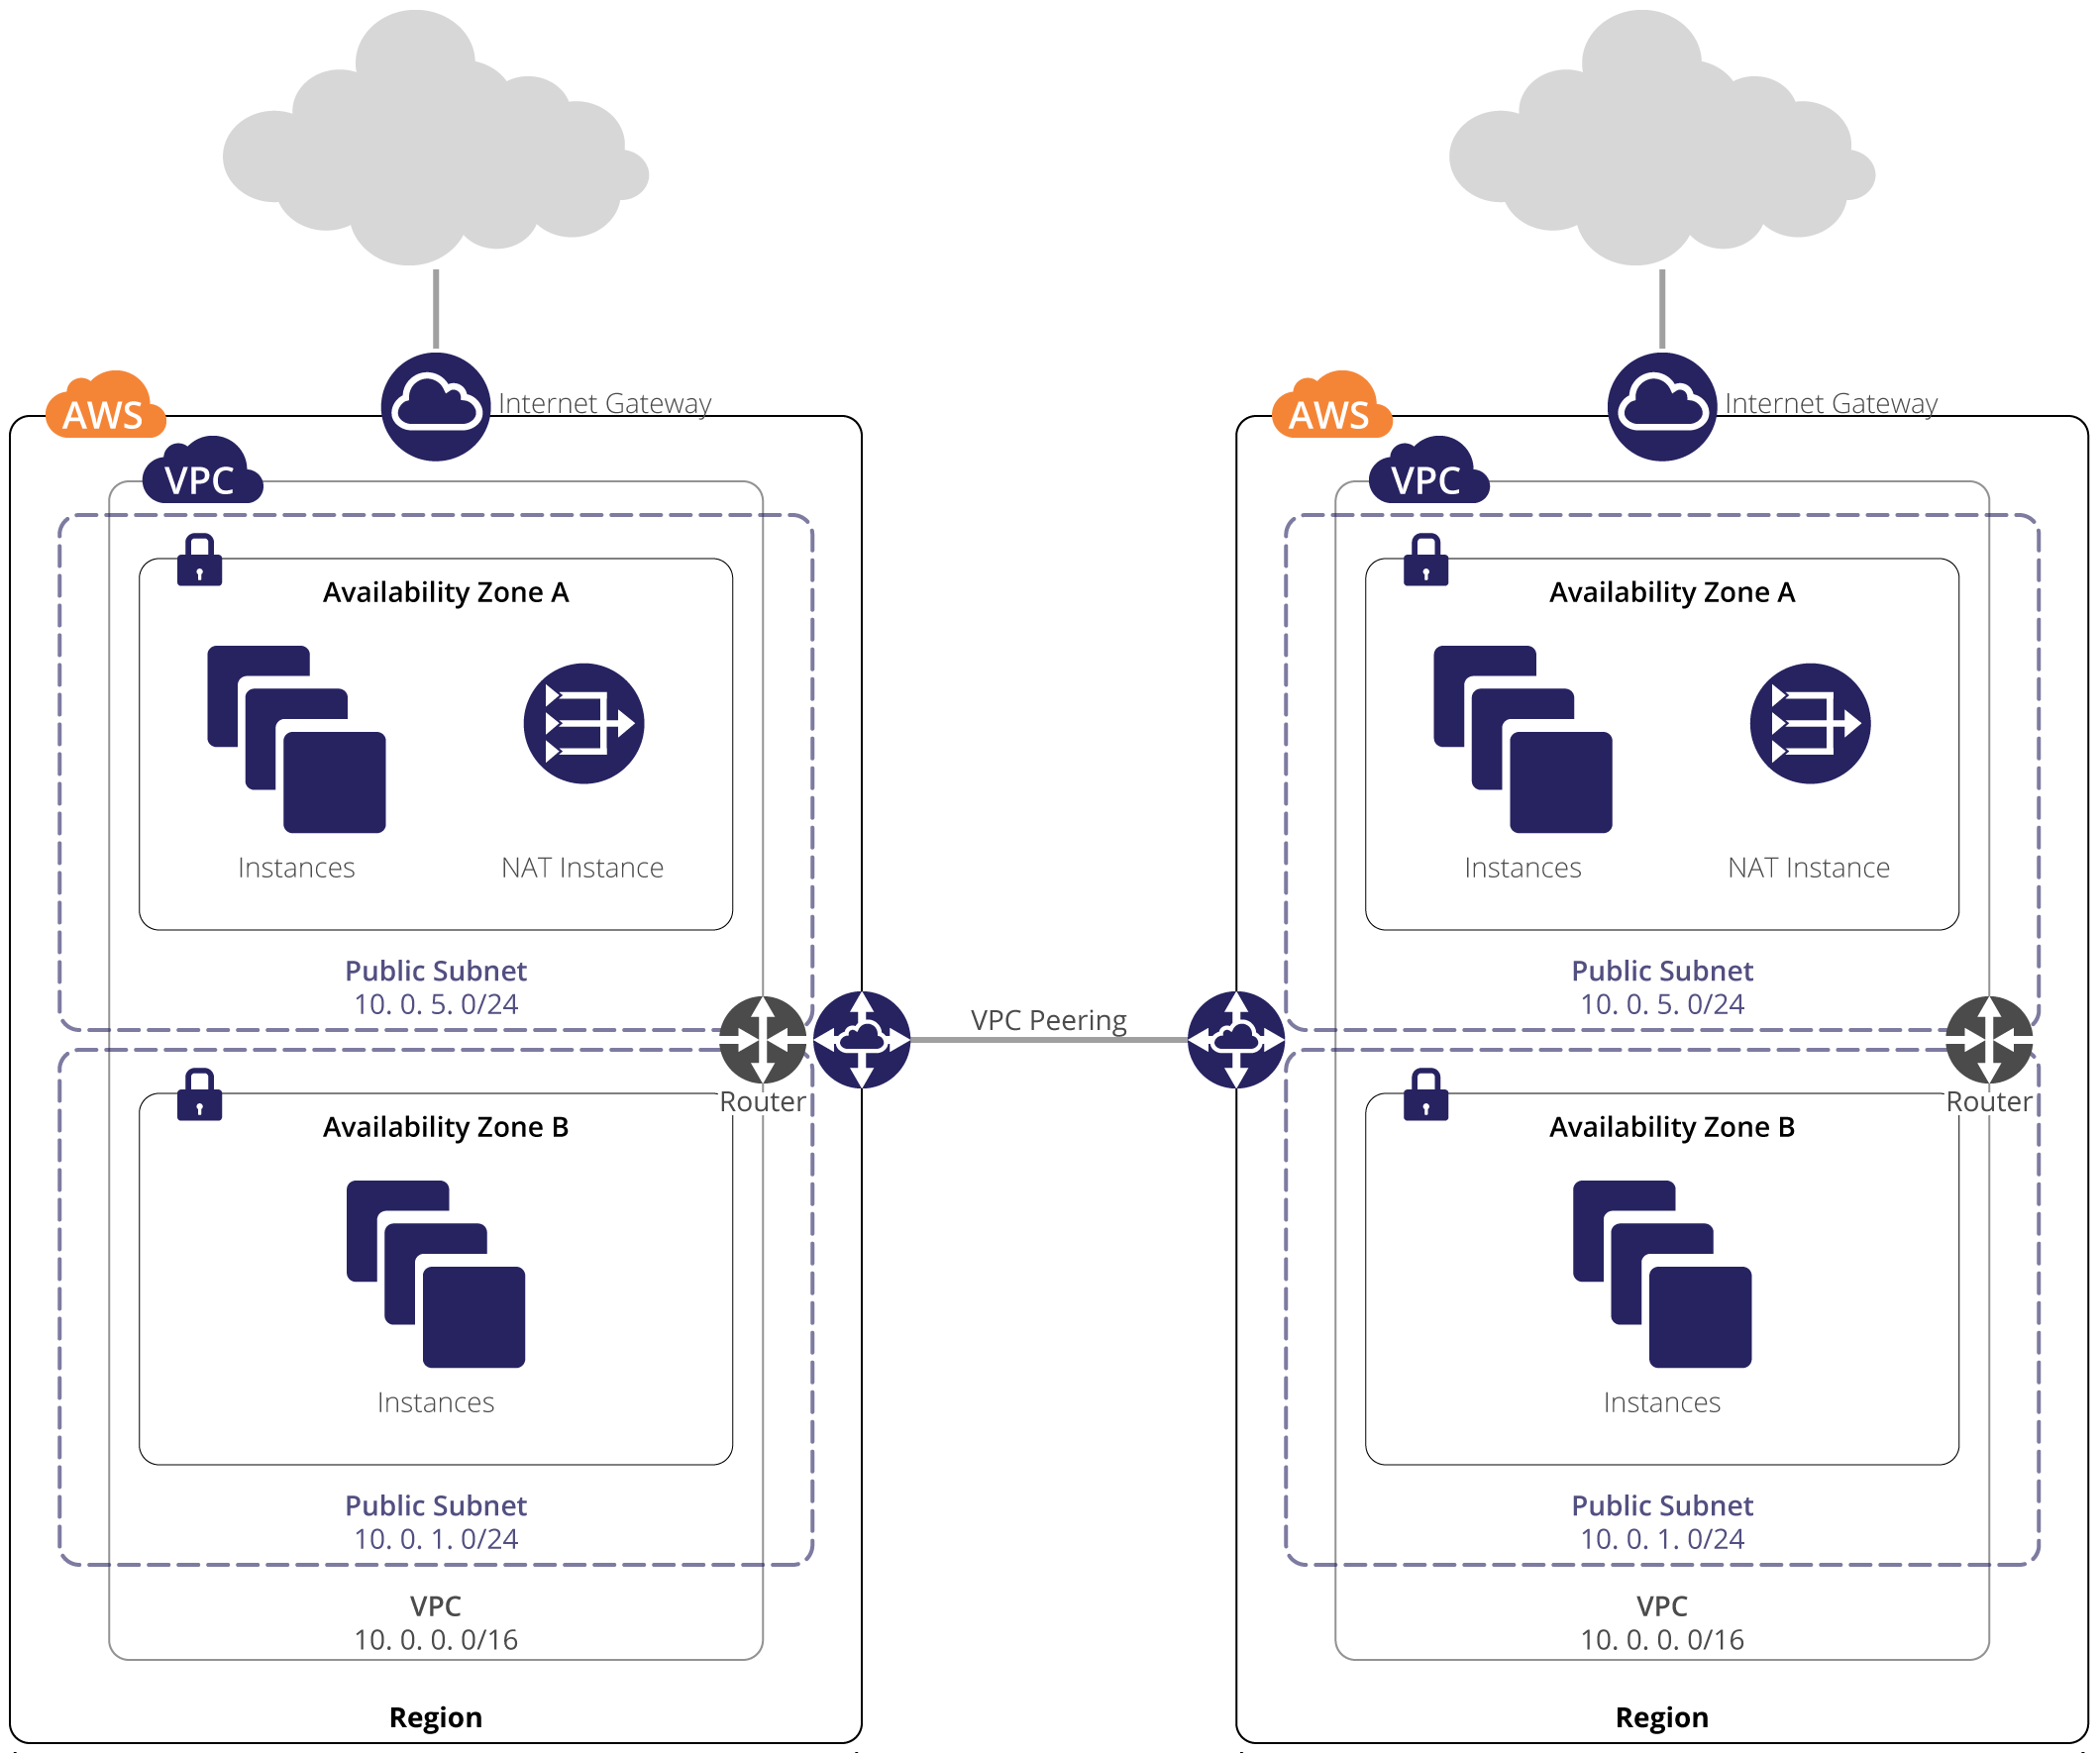
4.11. Deployment Summary
At this point, using an IAM user, you have deployed a geographically redundant and secure network environment, hosting multiple virtual servers. Within the environment, your servers can be completely isolated from the Internet, can make outbound Internet requests only, or can be accessed directly from the Internet on ports of your choosing. You are up and running in the Cloud, in a secure environment, and are familiar with the use of the AWS Command Line tools. If you are not familiar with the AWS Console, it is recommended that you familiarise yourself with it, and with the CloudWatch monitoring functionality it offers. While basic, CloudWatch offers visibility into metrics associated with your AWS resources. These include CPU Usage, Network Usage, and Disk Usage, as well as Instance and System Health Check.
4.12. Database in the Cloud Considerations
As alluded to earlier, when deploying Cloud servers, important considerations include Instance Type, Instance Storage, and Network Performance. Here we will go into more depth on these topics.
4.12.1. Instance Type
There are a number of different types of AWS Instances. In broad categories, these are General Purpose, Compute Optimised, Memory Optimised, Accelerated Computing & Storage Optimised instances. The full list of instance types can be reviewed here. Instance characteristics to pay specific attention to when choosing a suitable instance type for your database host are the following, each of which are explained in details in the Instance Types list:
- Number of CPU cores: each virtual CPU core is a single hyperthread of a physical CPU. Depending on your CPU requirements, you may therefore need to allocate double or quadruple the number of CPUs you would use on a physical host for the same performance.
- RAM: When using an EBS-backed instance, it is possible to stop your instance and start it again as a different instance type. This means that it is possible to be conservative in your RAM requirements during your evaluation stage, reducing your costs, as nothing is lost by changing your instance type. Note that, as discussed earlier, if you are using ephemeral storage on your instance, data here will not survive a stop and start of an instance.
- EBS Optimisation: EBS-optimised instances offer significantly improved disk read/write performance. You should strongly consider taking advantage of this feature to reduce disk read and write latency.
- Enhanced Networking: Using Placement Groups (logical groups of EC2 instances within an Availability Zone), you can avail of Enhanced networking options that facilitate up to 10 Gbps for single-flow and 25 Gbps for multi-flow traffic in each direction (full duplex). Network traffic outside a cluster placement group (e.g. to the Internet) is limited to 5 Gbps (full duplex).
4.12.2. Instance Storage
When planning your database deployment, it is important to be aware of the different storage options available to EC2 instances, and the limitations and benefits of each.
Many instance types, except for the most basic, include what is known as ephemeral storage. Ephemeral storage is also known as local storage. It is storage that is local to your instance, i.e. served by the same physical server on which your instance runs. Because it is local, it offers low latency and high performance. As it is included with the instance, it also lowers your costs; there is no additional cost for your use of ephemeral storage. Some larger instances offer multiple ephemeral volumes, which you can stripe your data across to further increase performance. However, precisely because this is local rather than network storage, it is not possible to snapshot these volumes for backup purposes, as with EBS volumes. In addition, as stopping and starting an EC2 instance results in movement to a new physical server, all data in the ephemeral storage is lost when doing so. Note that it is not possible to recover data in an ephemeral data store when an instance is moved.
The other instance storage that is offered by Amazon is EBS or Elastic Block Storage. This is network-attached persistent storage. Volumes can be attached to and detached from running instances, other than the root volume, and all volumes can be backed via the EC2 snapshot method. New volumes can be created directly from a snapshot, even in another availability zone. Snapshots can also be migrated to another AWS region, which is a convenient way to move large volumes of data.
Standard EBS Storage performance is heavily impacted by network traffic to and from your instance, as well as to and from any other instances hosted on the same physical server as you. As this is not ideal for applications requiring high and/or consistent disk performance, such as databases, Amazon introduced the concept of pIOPS, or provisioned I/O operations per second, to guarantee certain performance levels. Note that pIOPS is performance constrained by the size of the volume for which it is being provisioned, i.e. EBS Provisioned IOPS Maximum IOPS:GB ratio is 30:1, therefore to obtain a throughput of 3,000 I/O operations per second, your volume size would need to be a minimum of 100GB in size.
Finally, as you will have noticed in the Instance Types matrix, some instance types include the EBS Optimised feature. EBS-optimized instances deliver dedicated throughput between Amazon EC2 and Amazon EBS, with options between 500 and 4,000 Megabits per second (Mbps) depending on the instance type used. The dedicated throughput minimizes contention between Amazon EBS I/O and other traffic from your EC2 instance, resulting in significantly increased read/write performance.
4.12.3. Network Performance
In addition to the network performance points discussed above, relating to disk performance, every instance has a defined level of network throughput support. In the AWS Instance Types Guide, these levels are defined as Low, Low-to-Moderate, Moderate, High, 10 Gigabit, 25 Gigabit. No specific guarantees are provided by Amazon for throughput levels below the 10 Gigabit level. It is therefore important to benchmark instance network performance for critical applications prior to a production deployment. As a rough guideline, an AWS RDS MySQL instance at Amazon’s minimum recommended specification has “High” network performance. These instances are similar to the m3.xlarge instance type. This instance type also supports EBS Optimisation.
4.13. ClusterControl: Automating Database Management in the Cloud
You’ve deployed your VPC, carefully chosen and benchmarked your production EC2 instances, allocated high-performing data disks. Now what?
Database management has traditionally been complex and time-consuming. Deployment, with the headaches of security, complex networking, backup planning and implementation, and monitoring, has been a headache. Scaling out your database cluster has been a major undertaking. In a world where 24/7 availability and rapid disaster recovery is expected, managing even a single database cluster can be a full-time job. We have endeavoured to address infrastructure components of this earlier, but now it’s time to focus on the database server itself.
Severalnines’ ClusterControl is a database deployment and management tool that addresses the above, facilitating rapid deployment of redundant, secure database clusters or nodes, including advanced backup and monitoring functionality. With plugins supporting Nagios, PagerDuty, and Zabbix, among others, ClusterControl integrates well with existing infrastructure and tools to help you manage your database servers with confidence.
4.14. Controlling and automating MongoDB in the Cloud
MongoDB is the leading NoSQL database server in the world today. Using ClusterControl, you’re now going to deploy a MongoDB Replica Set with three data nodes in a single region, and look at some of the features of the ClusterControl application.
First, you will need to deploy four AWS instances. For a production platform, the instance type should be carefully chosen based on the guidelines we have previously discussed, but for our purposes instances with 2 virtual CPUs and 4GB RAM will be sufficient. One of these nodes will host ClusterControl, the others will be used to deploy the three database nodes.
Begin by creating your database nodes’ security group, allowing inbound traffic on port 27017. There is no need to restrict outbound traffic, but should you wish to do so, allow outbound traffic on ports 1024-65535 to facilitate outbound communication from the database servers.
Next create the security group for your ClusterControl node. Allow inbound traffic on ports 22, and 80. Add this security group ID to your database nodes security group, and allow unrestricted TCP communication. This will facilitate communication between the two security groups, without allowing ssh access to the database nodes from external clients.
Launch the instances into their respective security groups, choosing for each instance a KeyPair for which you have the ssh key. For the purposes of this task, use the same KeyPair for all instances. If you have lost the ssh key for your KeyPair, you will have to create a new KeyPair. When launching the instances, do not choose the default Amazon Linux image, instead choose an AMI based on a supported operating system listed here. As I am using AWS region EU-CENTRAL-1, I will use community AMI ami-fa2df395, a CentOS 7 image, for this purpose.
Use the describe-instances command detailed previously to confirm that your instances are running, and when confirmed, log in to the ClusterControl instance via ssh.
Copy the public key file you downloaded when creating your KeyPair to the ClusterControl instance. You can use the scp command for this purpose. For now, let’s leave it in the default /home/centos directory, the home directory of the centos user. I have called mine s9s.pem.
To install ClusterControl, run the following commands:
$ wget http://www.severalnines.com/downloads/cmon/install-cc
$ chmod+x install-cc
$ ./install-cc# as root or sudo user
The installation will walk you through some initial questions, after which it will take a few minutes to retrieve and install dependencies using your operating system’s package manager.
When installation is complete, point your your web browser to http://<address of your ClusterControl instance>. You can find the external facing address of the instance using the describe-instances command.
Once you have successfully logged in, you will see the following screen, and can continue to deploying your MongoDB Replica Set.
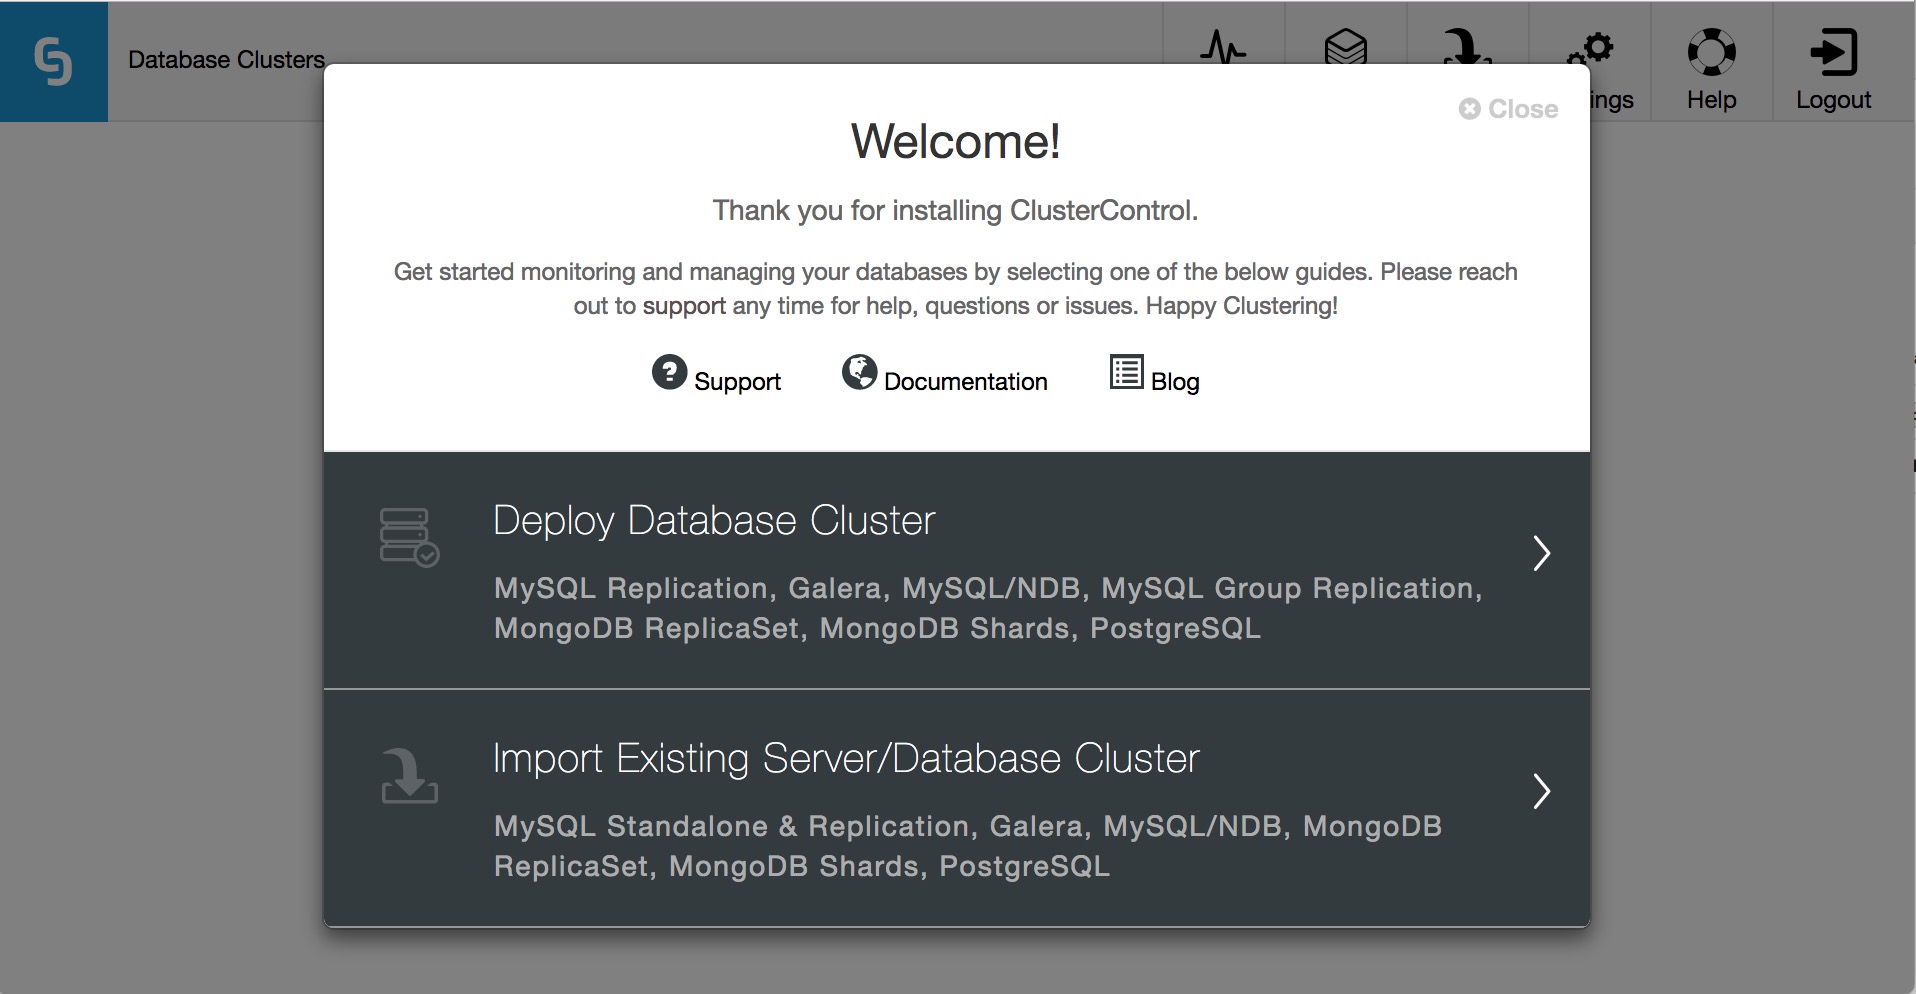
As you can see, ClusterControl can also import existing database clusters, allowing it to manage your existing infrastructure as easily as new deployments.
For our purposes, you are going to click Deploy Database Cluster. On the next screen you will see the selection of database servers and cluster types that ClusterControl supports. Click the tab labelled MongoDB ReplicaSet, to go to this tab. Here the values with which you are concerned are SSH User, SSH Key Path, and Cluster Name. The port should already be 22, the default ssh port, and the AMI we are using does not require a Sudo Password.

The ssh user for the CentOS 7 AMI is centos, and the SSH Key Path is /home/centos/s9s.pem, or the appropriate path depending on your own Key file name. Let’s use MongoDB-RS0 as the Cluster Name. Accepting the default options, we click Continue.
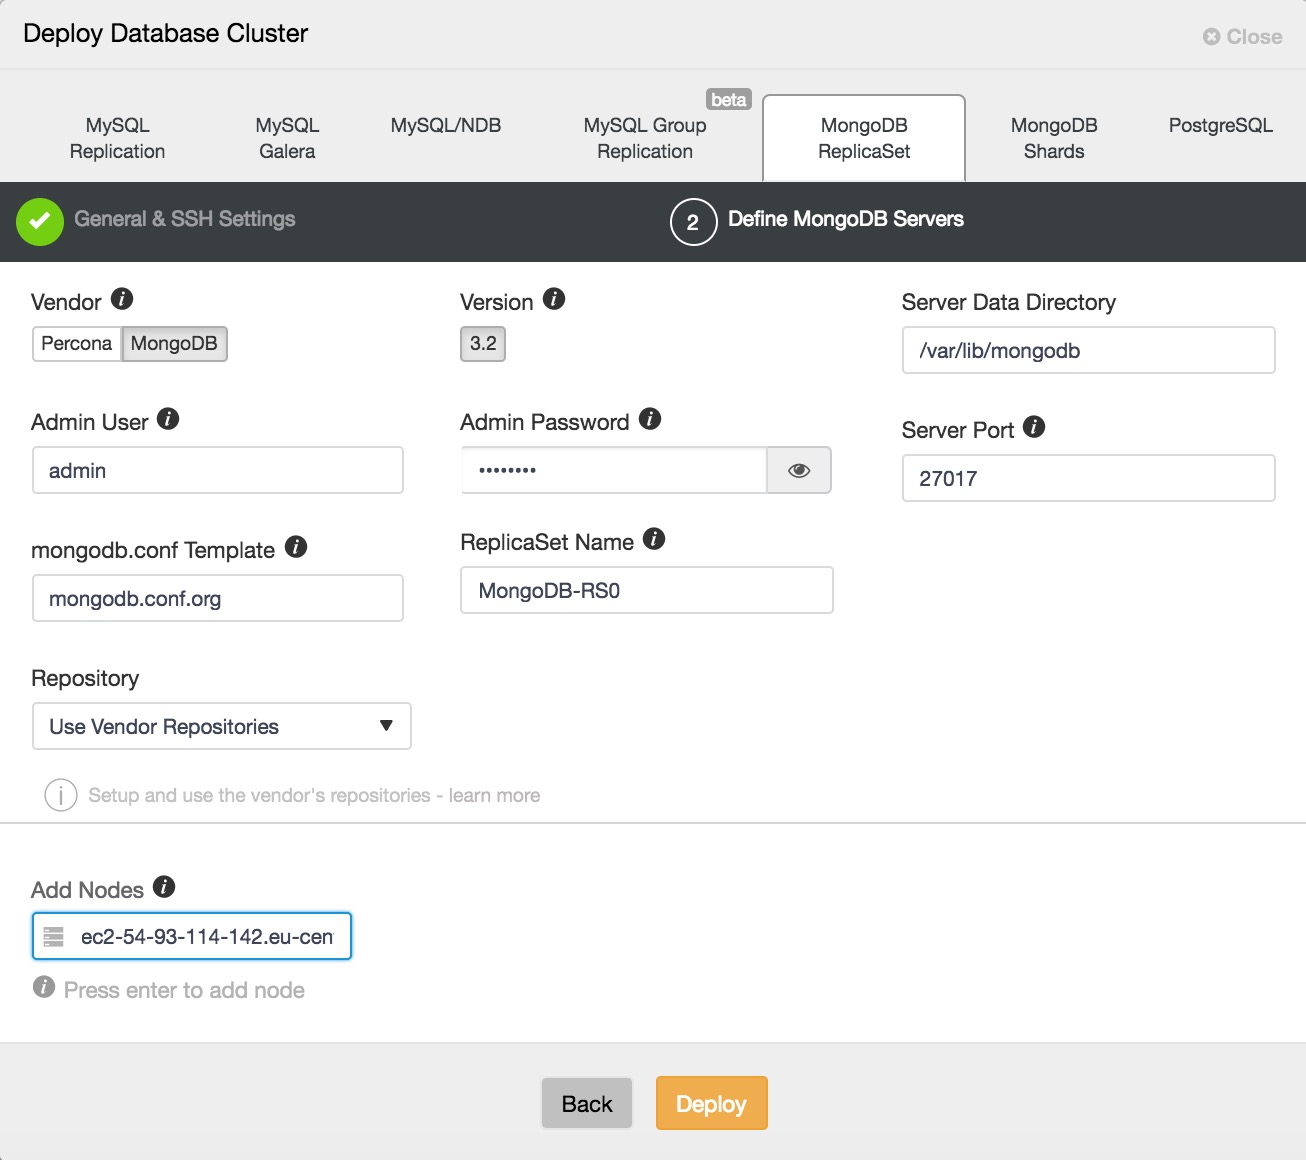
Here we can choose between the MongoDB official build, and a Percona build. Select whichever you prefer, and supply an admin user and password with which to configure MongoDB securely. Note that ClusterControl will not let you proceed unless you provide these details. Make a note of the credentials you have supplied, you will need them to log in to the deployed MongoDB database, if you wish to later use it. Now choose a Replica Set name, or accept the default. We are going to use the vendor repositories, but be aware that you can configure ClusterControl to use your own repositories or those of a third party, if you prefer.
Add your database nodes, one at a time. You can choose to use the external IP address, but if you provide the hostname, which is generally recommended, ClusterControl will record all network interfaces in the hosts, and you will be able to choose the interface on which you would like to deploy. Once you have added your three database nodes, click Deploy. ClusterControl will now deploy your MongoDB Replica Set. Click Full Job Details to observe as it carries out the configuration of your cluster. When the job is complete, go to the Database Clusters screen and see your cluster.
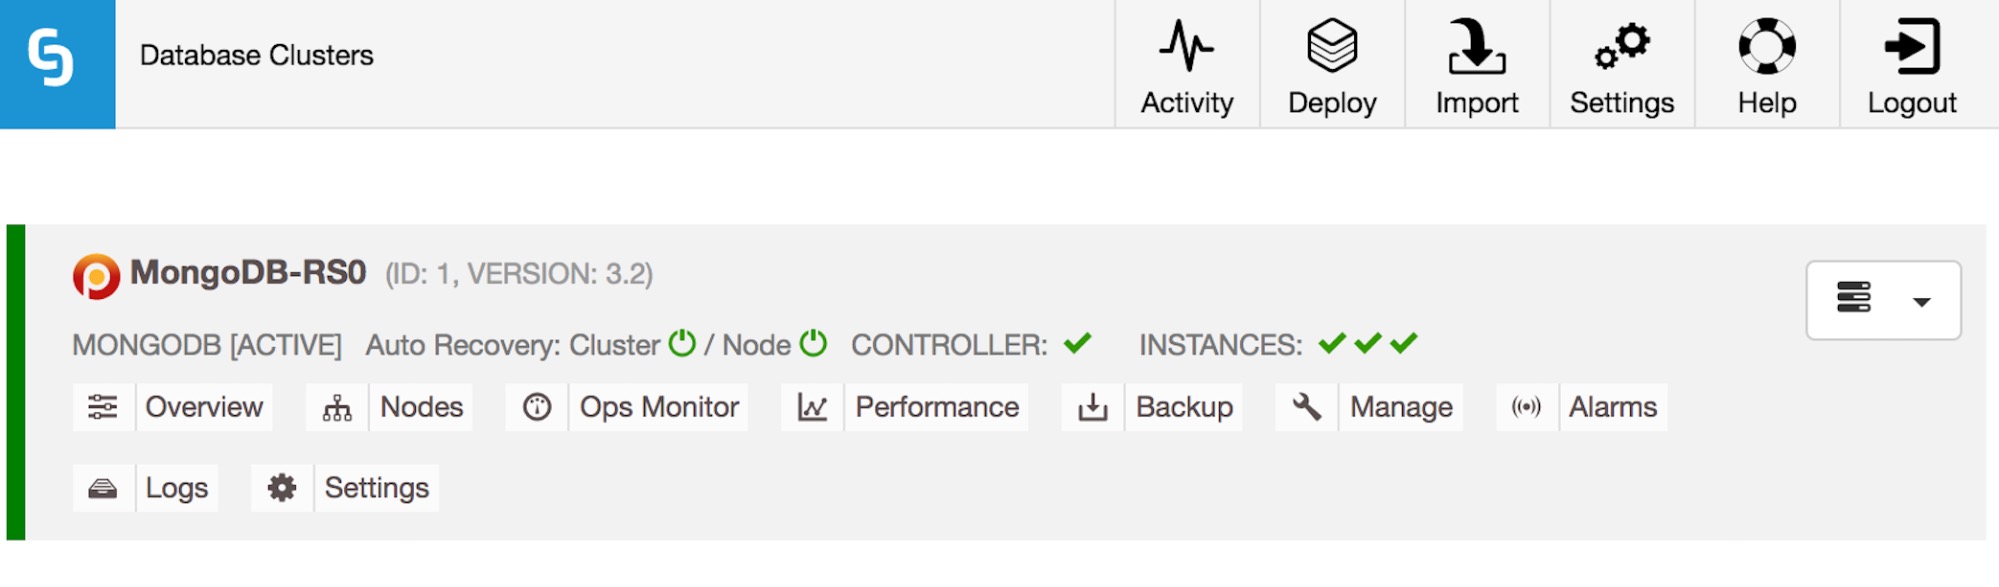
Your MongoDB Replica Set is deployed, and you can connect to it remotely with the admin credentials you chose. Now, let’s take a look at the ClusterControl interface. In this view, the Database Clusters view, you can see all of the clusters you are managing. You see the cluster name you’ve chosen, followed by the software version; in this case you deployed MongoDB 3.2.

Taking a closer look, you can see that Auto Recovery is enabled at both a cluster and a node level; in the case of failures, ClusterControl will attempt to recover your cluster or the individual node having an issue. The green tick beside each node also displays the cluster’s health status at a glance.

Overview provides a high level overview of the cluster as a whole, covering the core MongoDB metrics, as well as Network, Locking, and Wired Tiger engine-specific performance metrics.
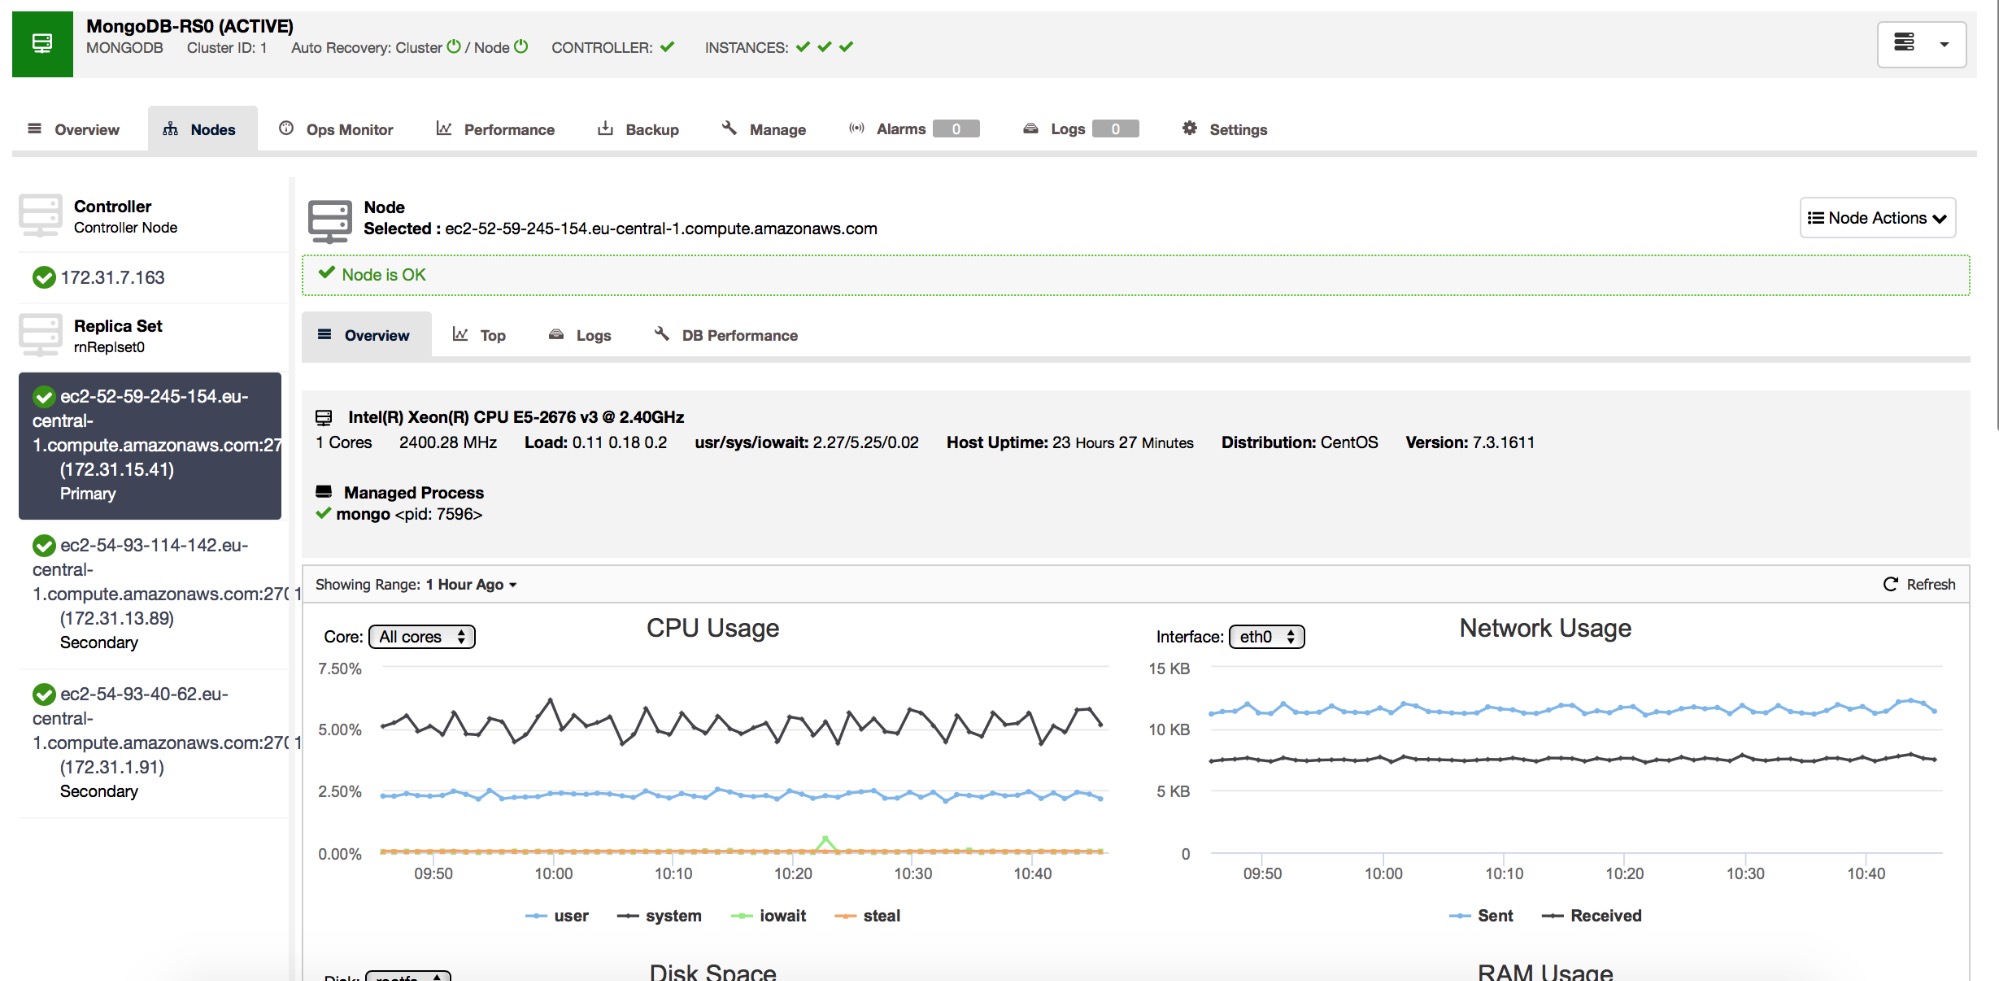
Nodes shows a host by host view, showing host and database performance metrics as well as logs local to the host and top command output. Hosts are managed from this view, with functionality including maintenance mode accessible from the Node Actions menu in the upper right of the screen, which also offers the options to Step down, Restart, Freeze, or Stop a Node, or to reboot the host on which it resides.
Ops Monitor allows you to view and interacts with operations currently running on the cluster.
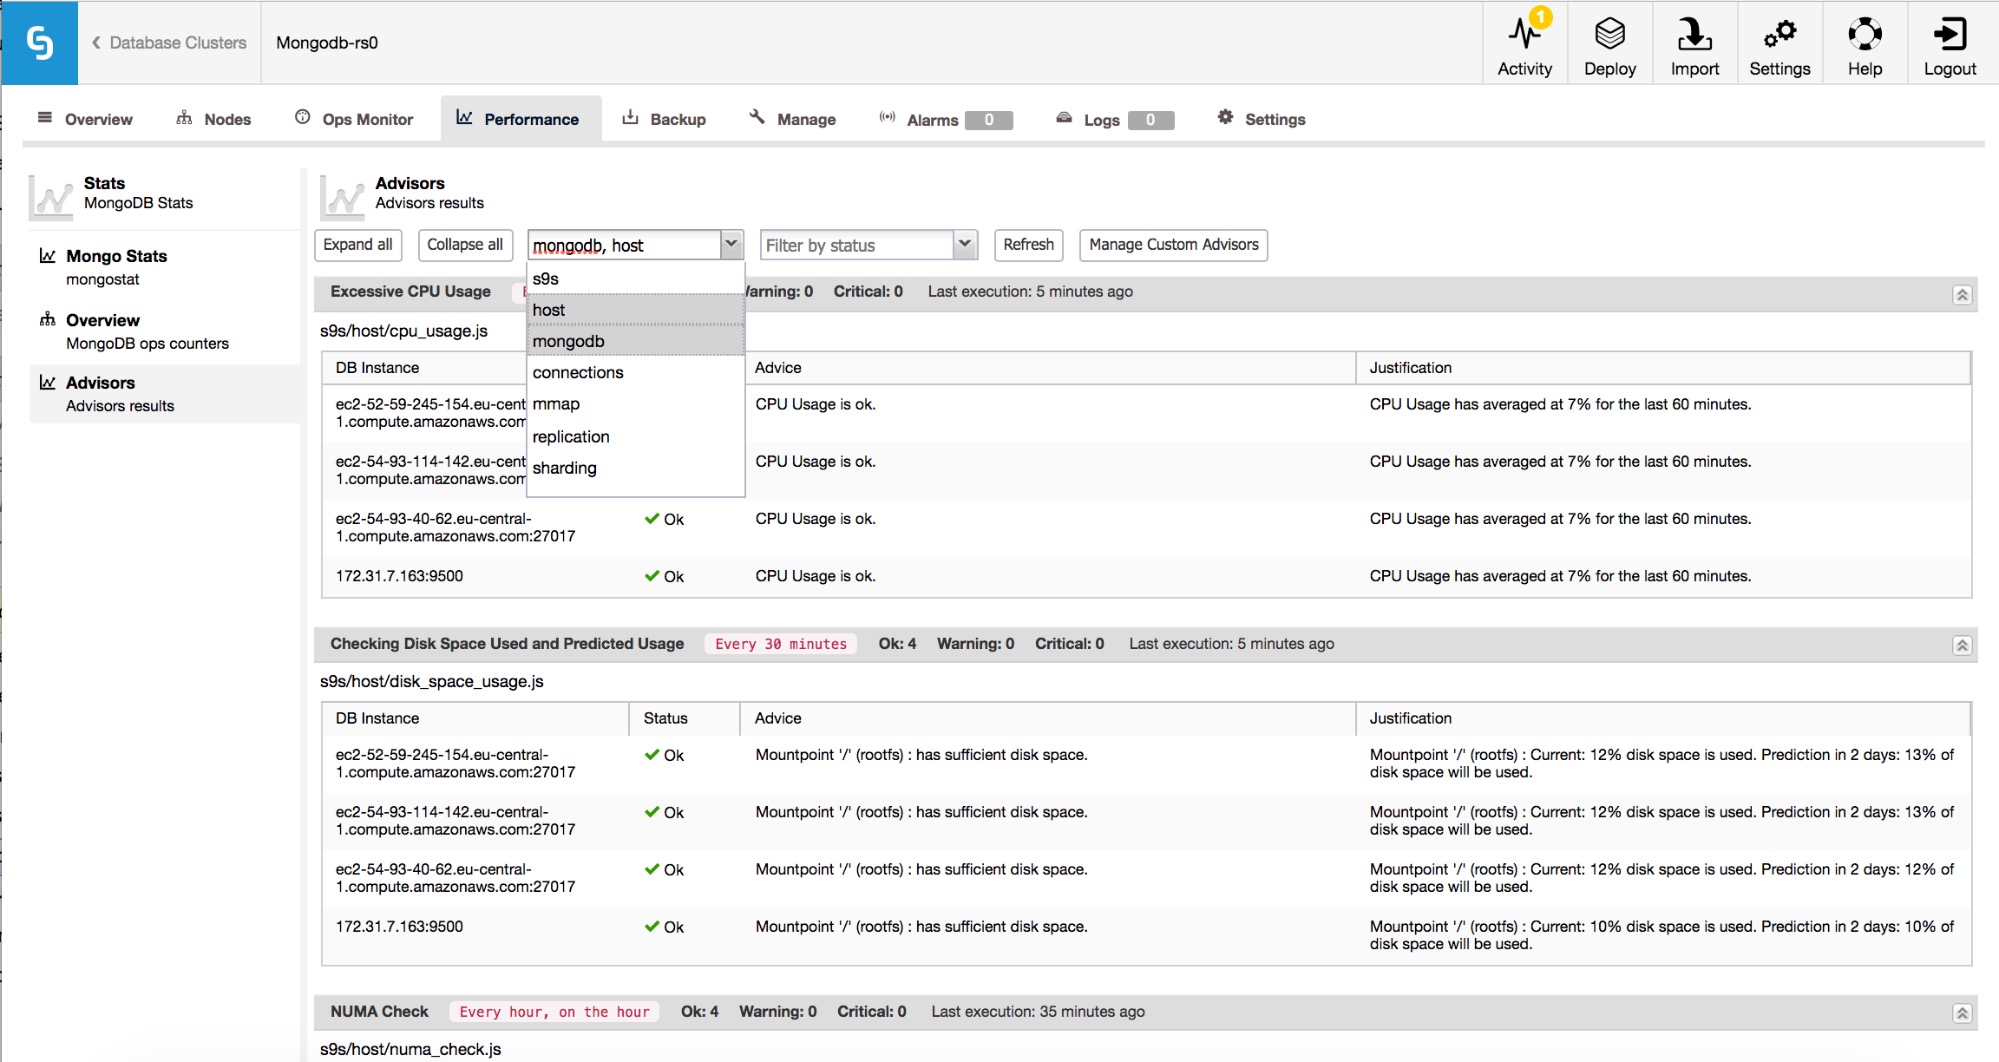
A key feature, found under Performance, is ClusterControl’s Advisors. These are individual monitors that track key aspects of your clusters, warning you of potentially performance impacting conditions. While a detailed selection of Advisors is provided, covering everything from host metrics to detailed database server-specific features, there is also the option to add your own Advisors.
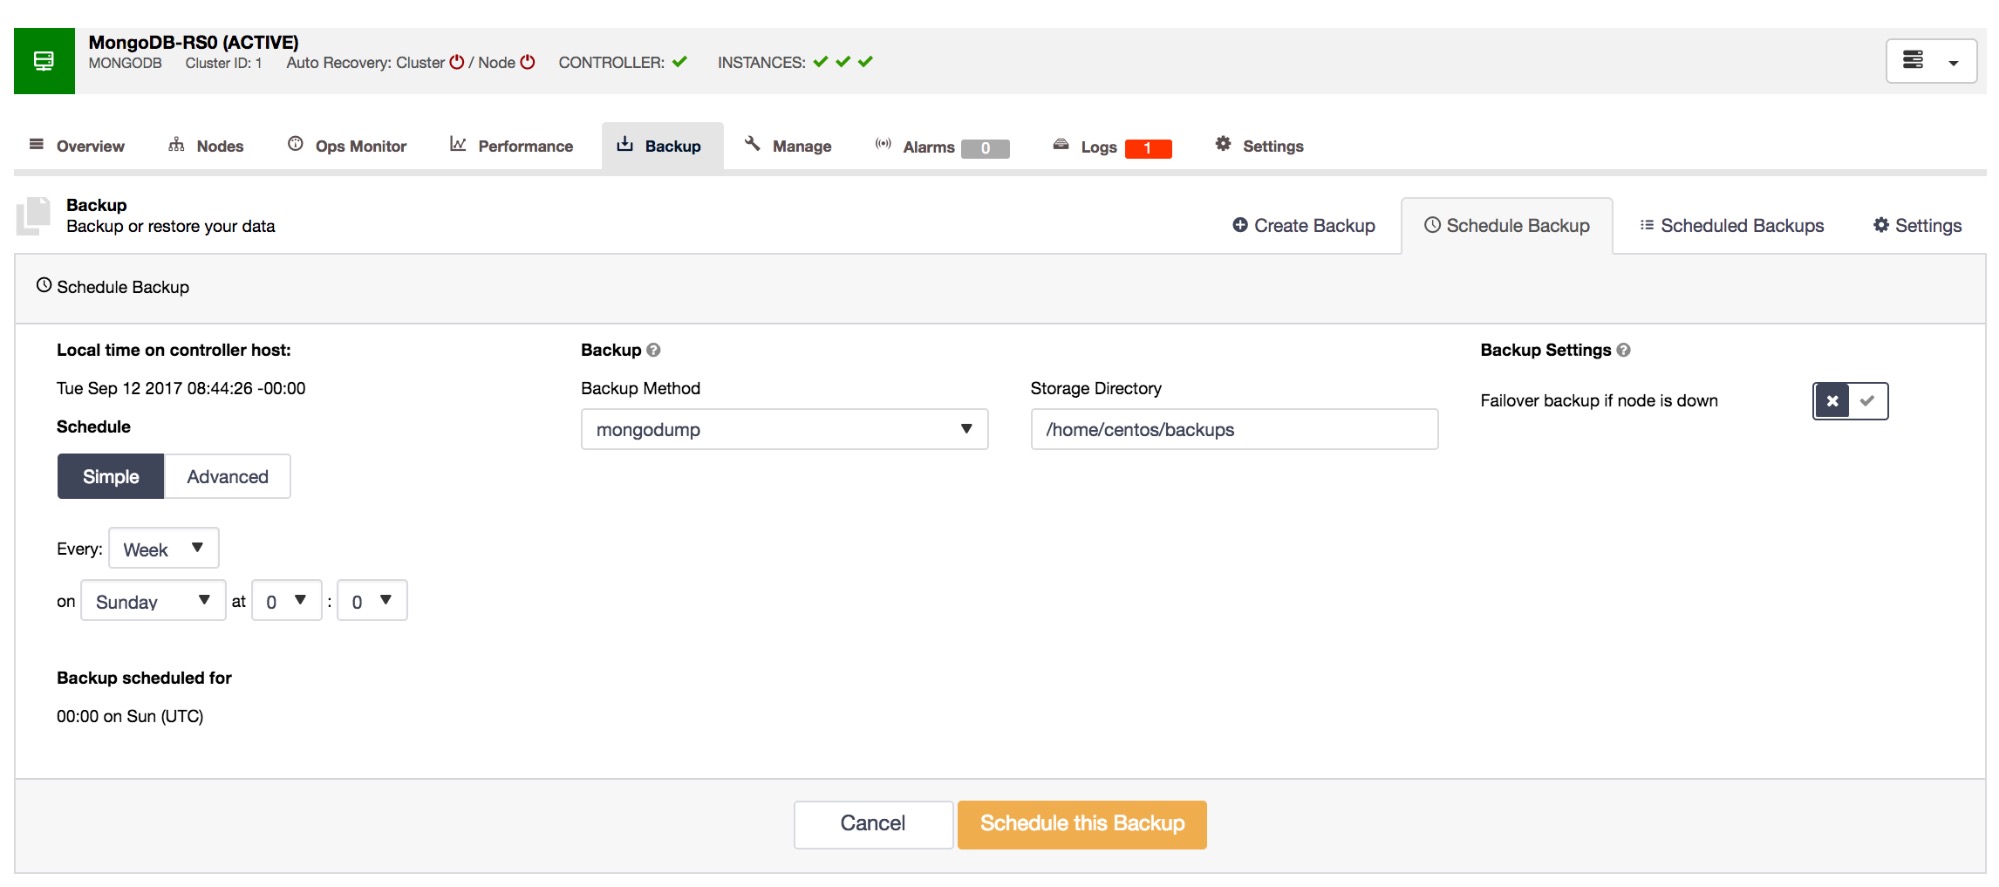
The last feature we will cover here is Backups. ClusterControl provides a backup feature that allows a full cluster consistent backup, or simply a standard mongodump backup if you prefer. It also provides the facility to create scheduled backups to run periodically to a schedule of your choosing. Backup retention is also handled, with the option to retain backups for a limited period, avoiding storage issues.
5. In Conclusion
Over the course of this paper, we have covered the details of AWS infrastructure deployment, considerations for deploying your database server(s) in the cloud, and finished with an overview of how to automate the deployment and management of a MongoDB cluster using ClusterControl from Severalnines.
You are now equipped to deploy your database clusters in a redundant, scalable, cloud infrastructure, and manage them with ClusterControl.